Pages

Saturday, November 12, 2011

My First Sewing Project


A couple months ago I finally bought my first sewing machine! I have always wanted to learn how to sew, but never followed through with learning. This Halloween I decided to make a cape for our son's costume. {He was Super Wyatt.}


I had my mom come over to help direct, but I did all the sewing. After two hours and a back ache it was finished! It turned out great! {Yes, there were some opportunities, but who's counting?}

I had bought a pajama set from Wal Mart and ironed on felt to cover the Hippo that was on the front of the shirt to make his Super Hero Emblem. I used the rest of the felt to create a mask. Over all the package was perfect! I couldn't be more happy with how it all turned out!

Of course, our son being so excited had to pose in the mirror for what seemed like forever. Then he proceeded to run around the house yelling, "I'm super Wyatt! I am going to save the world!"

Absolutely priceless!


Thursday, September 29, 2011

Sensory Bin

Well, I have been looking for creative ways to keep my three year old busy and found this idea on Pinterest. While the ones I saw were made up of colored rice (which is still quite neat) I decided to make mine a little different.

I did use some rice, however, to make our sensory bin, but then added some others as well.

One bag each:
  • Brown Rice
  • White Rice
  • Split Peas
  • Chick Peas
  • Lentils
  • Navey Beans
  • Pinto Beans


What a big hit it was! He loves it. We started off on the island and that was a bit messy, so we moved to the floor. I spread out a large blanket and sat the bin in the middle. MUCH easier clean up! I gave him a funnel that my husband "improved" by making the bottom end a little bigger, a measuring cup, a coffee scoop, and a handled measuring cup. He spends a great deal of time filling and dumping.

Of course, I shouldn't have to say it, but I will anyway, beans and rice are for play only, do not eat. Make sure little ones are always supervised! This is easy to put together and stores nicely in the container with lid. Great for rainy days and indoor play.


Hope you enjoy!


Monday, September 19, 2011

Snack Fun!

When it is time for snack, why not make it fun! I did this with my son the other day to mix things up a bit.

I got a pipe cleaner and bent the end:


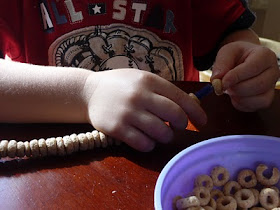
I got him bowl of cheerios:


Then I told him to string the cheerios onto the pipecleaner, and once he had them strung he could take them off and eat them.

He took it very seriously. It made out to be a good excercise for hand eye cordination too!


He was so proud of what he did after he had finished! Funny how something so little can make their day!  Enjoy!


Wednesday, August 31, 2011

Chalk It Up!

Once again my family has found itself pretty busy lately. Never a dull moment around here this summner. Despite our packed calendar I have really enjoyed the family time we have had this year. Yesterday was so beautiful that on a whim decided to repurpose a bulletin board I had salvaged from my grandparents house. I have been wanting to make it into a chalkboard for my son who is three. It would be a good way to boost his creativity as well as a great tool for learning. I started by taking all the staples out, and repainting the frame.


Then with chalkboard paint I had purchased at Lowes I painted the inside which was already black. It dried so fast being outside in the sun that I was able to put it up only a few hours after I had finished! Our house is small and we don't have a lot of wall space, so I decided to put it in our living room where there would be easy access as well as a hard surface floor. I wasn't going to put it in his bedroom with carpet. I am not a big fan of messes. I had brought out his table and chairs too, so now our living room is doubling as what could easily take as a mini class room!


I loved the way it turned out! It was so easy to do too! So much fun to come! Enjoy!


Tuesday, August 9, 2011

Ornaments

I was searching for an idea for a couple of wedding gifts when I got the idea to paint some blank Christmas bulbs that I found at Hobby Lobby. I wanted a keepsake gift, something that they could hang on to for years to come. So I painted them with the intention of including their wedding date on them.

A christmas bulb can be used for Christmas decoration or all year round depending on the style or your decor. 

Not to mention affordablity. A pack of four bulbs cost under $5. A great way to make something that could be so ordinary so special for someone else.


Enjoy!


Monday, August 1, 2011

Homemade Laundry Detergent

So in an effort to save money I decided that a good place to start would be making some of the things I need myself instead of buying from a store. One thing I do a lot of is laundry. Having a three year old it is hard to avoid.

I found a recipe online for making homemade liquid laundry detergent from http://www.thefamilyhomestead.com/ by Crystal Miller. The recipe is simple, easy to make and seems to work well. I have a front loader and was concerned about how things would wash up, but I didn't seem to have a problem.

For the recipe you will need: 
  •  a bar of soap, I used Fels Naptha. You can also use Ivory, Sunlight, Kirks Hardwater Castile or Zote bars.
  • Arm and Hammer Super Washing Soda
  • Borax
  • water
  • bucket, I used a 5 gallon bucket (I figured bigger was better so I didn't make a mess)

First, start by grating 1/3 of the bar of soap you have choosen. I grated it in the large sauce pan I would be using. Then add 6 cups of water and heat until the soap shavings melt. Then add 1/2 cup washing soda and 1/2 cup Borax until they dissolve. Remove from heat.


Pour 4 cups of hot water into the bucket and add your detergent mixture. Stir.  Add 1 gallon and 6 cups of water and stir again.


Then let the mixture sit for 24 hours.


After the 24 hour waiting period you can then pour your mixture in an clean empty container to store. Shake before using. 1/2 cup per load should work for normal wear washes.


Hope you try this! It was not hard at all to make and did not take long to do either. Save yourself some money and make your own!

Enjoy!


Thursday, July 7, 2011

Project Dining Room Table


Well, the month of June has come and gone in just a blink of the eye. I don't remember ever being this busy! Things have finally seemed to taper off a tad, enough to let me at least get caught up a little around here. I have been quite anxious to begin my dining room table project and I finially found the time to do it!
                       
I started with a table I found at Habitat for Humanity for $45. It was in good shape just not the size I wanted.


So I started by taking the old table top off.


Then I found lumber that I had laying around that worked perfect! Just the right length so I didn't have to cut and with the four boards put together they were the right width!


Then I painted it a creamy white color called "Cinnamon Burst." Which I already had from painting a room in our house!


It didn't take long for the paint to dry since it was hot and sunny outside where I worked on it. So I was able to move it inside rather quickly. My farmhouse table is now complete and I am quite please with the outcome! Total price: $45!


Now, instead of craming 6 people around a small round table, we can comfortably seat company. And as our family grows I am sure this table will be in the center of it all as we eat, play, talk, and love each other!


Tuesday, May 31, 2011

Pine Cones

I was outside enjoying the sunshine when my son started bringing me pine cones that he had found on the ground. I got to looking at them and thinking, "These would make a really neat center piece." So we went on to gather a grocery sack full of pine cones together.

I bought some white spray paint and started painting. After painting some of them white  I noticed that the white with the natural color of the pine cones looked nice together giving a warm and charming look.


Then I went on to do an all white arrangement which has a sort of shabby chic look.


These are a great way to bring the outdoors in for anyone who loves nature. They add a new dimension to center pieces and character.

 I plan on doing other assortments and eventually adding scents for potpourri. So far these two assortments are available for purchase at my shop. You can click on The ArtisTree on the left under the heading My Shop!


Enjoy!


Tuesday, May 24, 2011

Play- Doh

I always like to find a way to save money. I don't know anyone who doesn't really. A great way to save money is to make things yourself. That is why I began making my own playdoh for my son. Buying from the store will add up quick, but why spend extra money on playdoh from the store when you can make it from everything you already have in your pantry!

This is a recipe that I have found that worked really great for us. This recipe can last a long time depending on how often it is used.


Play-Doh Recipe

3 c. flour
1 c. salt
6 tsp. cream of tartar
3 c. water
3 Tbsp vegetable oil
food coloring (optional)

Mix flour, salt, cream of tartar in large sauce pan. 
In a bowl mix together water and oil then add to sauce pan.
Cook over medium heat stirring constantly until it thickens.
Add food coloring cook about five minutes.
Take out of pan and knead on a cutting board for a few minutes.


This is super easy to do and makes a lot! It is not recommended to eat, not because it isn't safe, but it is extremely salty. It is also a great way to get your kids involved by allowing them help with the process depending on their age! Have fun and enjoy!


Monday, May 16, 2011

"Growing up" on the Farm

Well Saturday was the day for weddings and baby showers! I was invited to two weddings, a baby shower, among a couple others happenings. I couldn't be everywhere at once, but I did go to a dear friends baby shower. I decided to make her a growth chart for her little boy! She is having farm themed nursery so I decided to do a "On the Farm" growth chart:

Baby Lanes "On the Farm" growth chart


"On the Farm"


"On the Farm"

I love how it turned out! It was a lot of fun being able to create something that little Lane can grow up with! Hopefully I will be able to do many more!

Friday, May 6, 2011

My First Sale

I was given a long time ago from my Amish cousins, a large assortment of letter stensils. They were all hand made in a variety of sizes and letter styles. I didn't know what I would use them for at the time, but I will be forever grateful that they gave them to me.

I decided to try using the stensils in a way that would fit with what I was working on. Watercolors. My first intent was to be names for nursery's or childrens rooms. So I used my sons name as an example:


I really loved how it turned out! They would look great framed or as is. I put them up in my sons room as is. It looks great! I put them up a little higher than I would like, but I didn't want to encourage little hands to grab them.


I figured other words could be done the same way, like "Love", "Joy", "Faith", ect. But by selling them individually, I can do just one letter too! That brings me to my first sale! The letter "A"! "A" for the first letter of the last name of my first customer! Each letter is it's own piece of art. The way the watercolor runs togther creating a unique look for each and every one!


"T"


I have also done "A B C" in the same style. I am quite please on how they turned out as well! 


It has been really nice to finally use my Amish cousins' stensils! I have been putting them to use quite a bit lately and have been having a lot of fun with it! 

Tuesday, May 3, 2011

Marigolds

I never dreamed my "Modern Marigolds" would catch the eye of so many people! I was flipping through a modern design catalog when I came across some metal art that gave me my inspiration. I am not a big fan of "modern" design by any means, but have noticed the trend for that clean lined, simple, yet bold look. So I thought I would try it and see what kind of response I would get. I was very surprised by the reaction!
"Marigolds"

Since then I have painted several more in an assortment of different colors which are available now in my shop. They vary slightly, but are generally the same. I have to say, after putting them in a frame they really did pop! I am going to keep one on my mantle; I love the way it looks!


Saturday, April 30, 2011

Try, try, try again!

Well this is officially my second attempt to understand the capabilities of the internet! I have started this blog in hopes that this time I will have a better understanding how to manage and operate a blog. I have never been a friend to technology; I don't even own a cell phone! But I have come to the realization that I must come to terms with the idea of "staying connected."

I have a shop on Etsy.com that I have began in December of last year. I started it in hopes to be able to continue as a stay at home mom, yet still paint and sell my artwork. So far it is going well! I have had four sales and have changed my focus a couple times now.

I started my shop by first listing a couple original pieces then made up prints of a few other originals that I had done. After not seeing much action with those, I decided to start making growth charts. Those were a ton of fun to make! Still, not seeing much actions I decided to change the size that I work.

Lately I have been working with 5x7 sized paintings. It makes sense this way because it will be easier for anyone to buy one and stick it into a frame they already have. Not everybody has experienced custom framing yet alone be able to really afford to do so with an economy like we have right now. That is how I got my first sales!

It is actually easier for me to work with 5x7 sized paper, since I have an active three year old bounding through out the house! I am able to complete more pieces and work faster.

It is funny how things change and adapt so quickly! I am just going to go with the flow and see where it takes me. It has been fun so far and quite the blessing!