Tuesday, May 31, 2011

Pine Cones

I was outside enjoying the sunshine when my son started bringing me pine cones that he had found on the ground. I got to looking at them and thinking, "These would make a really neat center piece." So we went on to gather a grocery sack full of pine cones together.

I bought some white spray paint and started painting. After painting some of them white  I noticed that the white with the natural color of the pine cones looked nice together giving a warm and charming look.


Then I went on to do an all white arrangement which has a sort of shabby chic look.


These are a great way to bring the outdoors in for anyone who loves nature. They add a new dimension to center pieces and character.

 I plan on doing other assortments and eventually adding scents for potpourri. So far these two assortments are available for purchase at my shop. You can click on The ArtisTree on the left under the heading My Shop!


Enjoy!


Tuesday, May 24, 2011

Play- Doh

I always like to find a way to save money. I don't know anyone who doesn't really. A great way to save money is to make things yourself. That is why I began making my own playdoh for my son. Buying from the store will add up quick, but why spend extra money on playdoh from the store when you can make it from everything you already have in your pantry!

This is a recipe that I have found that worked really great for us. This recipe can last a long time depending on how often it is used.


Play-Doh Recipe

3 c. flour
1 c. salt
6 tsp. cream of tartar
3 c. water
3 Tbsp vegetable oil
food coloring (optional)

Mix flour, salt, cream of tartar in large sauce pan. 
In a bowl mix together water and oil then add to sauce pan.
Cook over medium heat stirring constantly until it thickens.
Add food coloring cook about five minutes.
Take out of pan and knead on a cutting board for a few minutes.


This is super easy to do and makes a lot! It is not recommended to eat, not because it isn't safe, but it is extremely salty. It is also a great way to get your kids involved by allowing them help with the process depending on their age! Have fun and enjoy!


Monday, May 16, 2011

"Growing up" on the Farm

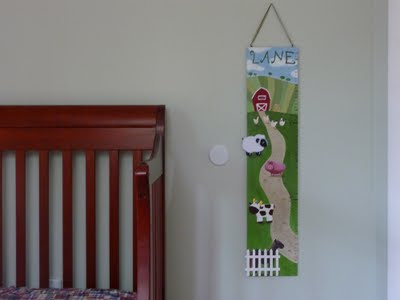
Well Saturday was the day for weddings and baby showers! I was invited to two weddings, a baby shower, among a couple others happenings. I couldn't be everywhere at once, but I did go to a dear friends baby shower. I decided to make her a growth chart for her little boy! She is having farm themed nursery so I decided to do a "On the Farm" growth chart:

Baby Lanes "On the Farm" growth chart


"On the Farm"


"On the Farm"

I love how it turned out! It was a lot of fun being able to create something that little Lane can grow up with! Hopefully I will be able to do many more!

Friday, May 6, 2011

My First Sale

I was given a long time ago from my Amish cousins, a large assortment of letter stensils. They were all hand made in a variety of sizes and letter styles. I didn't know what I would use them for at the time, but I will be forever grateful that they gave them to me.

I decided to try using the stensils in a way that would fit with what I was working on. Watercolors. My first intent was to be names for nursery's or childrens rooms. So I used my sons name as an example:


I really loved how it turned out! They would look great framed or as is. I put them up in my sons room as is. It looks great! I put them up a little higher than I would like, but I didn't want to encourage little hands to grab them.


I figured other words could be done the same way, like "Love", "Joy", "Faith", ect. But by selling them individually, I can do just one letter too! That brings me to my first sale! The letter "A"! "A" for the first letter of the last name of my first customer! Each letter is it's own piece of art. The way the watercolor runs togther creating a unique look for each and every one!


"T"


I have also done "A B C" in the same style. I am quite please on how they turned out as well! 


It has been really nice to finally use my Amish cousins' stensils! I have been putting them to use quite a bit lately and have been having a lot of fun with it! 

Tuesday, May 3, 2011

Marigolds

I never dreamed my "Modern Marigolds" would catch the eye of so many people! I was flipping through a modern design catalog when I came across some metal art that gave me my inspiration. I am not a big fan of "modern" design by any means, but have noticed the trend for that clean lined, simple, yet bold look. So I thought I would try it and see what kind of response I would get. I was very surprised by the reaction!
"Marigolds"

Since then I have painted several more in an assortment of different colors which are available now in my shop. They vary slightly, but are generally the same. I have to say, after putting them in a frame they really did pop! I am going to keep one on my mantle; I love the way it looks!