Showing posts with label DIY. Show all posts

Thursday, April 17, 2014

Rare Moments of Closeness


Sharing is caring! I caught both of them sharing yesterday. Twice. They shared a chair and a blanket! Yes, they were watching TV both times, but that is irrelevant. 


I brought up a rocking chair from downstairs. After cleaning it up and painting the cushion it was instantly a novelty. A few times I found myself in it as well, but with both kids on my lap rocking! It seems to be harder to hold both at one time! They do love rocking.


Friday, September 27, 2013

Fireplace Bookcase Insert

We listed our house a couple weeks ago. After the first week we had an offer, we countered, they walked. Then the next we we had another offer, after accepting it, the buyers changed their minds. Things have since slowed down, but we remain hopeful. Gods timing is always right, so we wait patiently.

Since we may be here through the winter, and will be heating with electric baseboards,we thought we should figure out ways to cope with heat loss to help save some money on the cost of heat. The fireplace, though it works, we have never used it and is probably the source of a lot of our loss of heat through out the cold months.

What to do? How about build a bookcase and insert it into the hole of the fireplace! My handy hubby also attached insulation to the backside with furring strips. He added trim and...ta daaa! We have a creative solution for storage and heat loss! I find it kind of ironic too having a bookcase inside a fireplace. But, it works nonetheless.


I hope it makes a difference this winter. If not, it did free up some space in the other bookcase for Wyatt's home-school material. So either way, I am one happy mama!


Thursday, July 18, 2013

Homemade Cloth Diaper Laundry Detergent


We have been using cloth diapers for nearly a year now and happy to say it is going quite well. We have been making our own liquid laundry detergent for a while, but found that we wouldn't be able to use in on our cloth diapers. The soap in the liquid detergent will build up residue and keep the diapers from absorbing well over time. So I had to find a recipe that would be compatible with cloth diapers. After searching online I found a number of recipes. Finding that they were all different in their own way I adapted them to create my own.

I have been using this recipe for as long as we have been cloth diapering. I have found it has been working very well. I will save my laundry process cloth diapers for another post, but for now I will share the recipe that I have been using.

All you need are three ingredients:

  • 2 cups Borax
  • 2 cups Washing Soda
  • 2 cups Oxi Clean
Mix well and store. I saved back an empty coffee can and gave it a fresh look to store my detergent in and use a scoop from a baby formula jug. When I begin my wash cycle I just add one scoop for a small load and two for a large load. All three ingredients can be found in the laundry soap aisle at your local grocery store.

Hope this works for you like it does for me. Enjoy!


Wednesday, July 17, 2013

Homemade Bug Spray


We live in the woods. As wonderful as it is, there is a downside: Bugs! Lots of them. We have bloodthirsty mosquito's and noseeum's. I had enough, and decided to find away to ward them off that didn't have nasty harsh chemicals. So, of course I had to make my own natural bug spray.

What do you need  besides an 8 oz spray bottle?

  • 8 oz. Witch Hazel
  • 26 drops Citronella Oil
  • 26 drops of Lemongrass Oil
  • 10-15- drops of Lavender Oil


You can find the essential oils at your local health food store and the witch hazel I found at Walmart for $1.44. Figuring out the cost after what you actually used, it works out to be only about $.75 per bottle! Crazy! 

I know I don't have to say it, but... Make sure you don't spray in your eyes and mouth. 

So hear's to being bug free! Enjoy!


Wednesday, February 27, 2013

The Creative Juices Are Flowing Again!

I think it probably has been over a year since I have created something for my shop. Sad, but justified. Having a baby doesn't leave you with a lot of extra free time. Not just with our very active and growing little girl, but with a very active, strong willed, almost five year old boy!

 Lately, I have felt a spurt of inspiration and I am going to try to hang on to it! Yesterday, I did some creating. Quite a bit actually. And decided to actually list something on my shop! Whew!


Hopefully I can keep the momentum going and not let the fire go out! To check out the listing click here!


Have a wonderful day all!


Saturday, January 19, 2013

Homemade Tooth Paste


Home made tooth paste? Really? Yes, really. And simple too! I have found many different ways to make it, but I ended up doing it this way, because it just made more sense to me. After some trial and error I feel have reached a mixture I am happy with.


Just mix equal parts coconut oil, xylitol, and baking soda. I did 1/4 cup of each. Then I added about 18-20 drops of spearmint oil to take the edge off the saltiness of the baking soda as well as to make my mouth feel fresher.

COCONUT OIL:  Has anti microbial and anti viral properties.

XYLITOL: Is an all natural sweetner, and is helpful in reducing plaque, has antimicrobial properties, and helps prevent tooth decay.

BAKING SODA: Plaque remover, whitener, cleans teeth and gums, helps prevent infections, and neutralizes acids in your mouth.

SPEARMINT/PEPPERMINT OIL: Adds to taste and helps take away the saltiness of the baking soda. It is also and antiseptic and helps remove bad breath.


As you can see it has a consistency similar to mashed potatoes. Just scoop onto your tooth brush to use. I will say, it takes a little getting used to. If you expect the same sudsy bath you give your teeth with regular store bought tooth paste you will be disappointed. But your teeth will feel clean after using it.

My husband was a little unsure at first, but soon was on board. Our son, well, not so much. But we'll keep working on him. If your kids still swallow their toothpaste I wouldn't really recommend the use of essential oils until you have researched them and are comfortable in doing so.

Enjoy!


Thursday, October 18, 2012

No Sew Fleece Scarf

I was at Hobby Lobby the other night and spotted a clearance basket of scrap material in little rolls. I looked through it and found myself a pretty sweet deal. I got a 1/4 yard of grey fleece 60 inches long. I immediately thought of an idea: a no-sew scarf!

It took a total of 15 minutes to do. I could have finished sooner, but with two kids, that's not always possible. This was so easy, if I can do it, anyone can!

First, fold the material length wise in half.


Then cut the end that is not folded all the way down the length of the fleece in about one inch strips. Cutting to about a half an inch to the fold.


Then after it is cut tie the pairs together. I alternated back and front when I tied so that it was fuller.


Ta daaaa!


Not too shabby for a whopping .88 cents if I don't say so myself. I will definitely be keeping my eyes open for more remnants like this next time I go to the store!


Thursday, September 20, 2012

Filling a Void


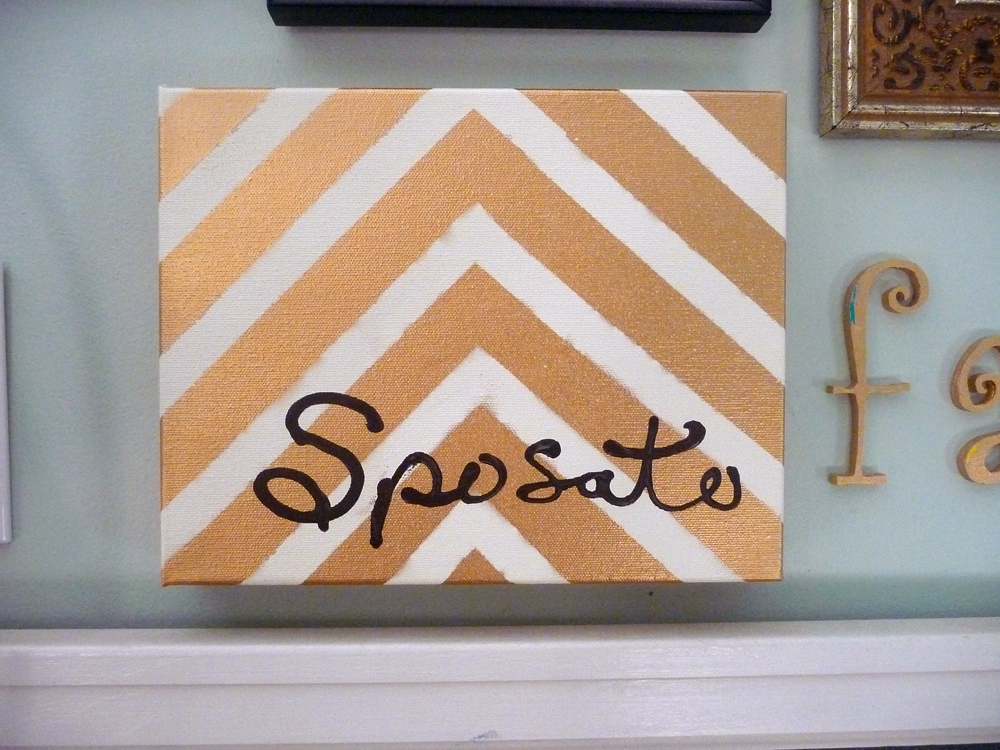
I have been looking for something to fill a void in my family gallery wall. I didn't really have another picture to put up so I was thinking something more artistic. I decided to do a small canvas with our name on it. I had some cream and gold spray paint already so, I started taping off the canvas. {It is kind of ironic that most of the overall tone of the wall is gold, I never liked gold.}


I have to say doing things like this with kids around is a bit tricky. Note my 'S'. I am not very happy with it, but that is what happens when your four year old son decides to touch it while it is drying. He said he thought it was chocolate. Right. Ah, well. It adds character.


I think overall it turned out great. It adds another element to the wall. It ties in perfect with everything else and was simple and easy to make.


Wednesday, September 12, 2012

Family Prayer Board

I have been wanting to create a way to post prayer requests that our family receives in a way that is visible for us to see daily and to help remind us who we need to pray for everyday. It had to be something that is easy to change and update.

I have been seeing message/ menu boards made with just a regular frame with scrapbook paper placed behind the glass. Dry erase markers are used to write on the glass. The more I thought about it the more I liked the idea for a Family Prayer Board!


The 8 x 10 frame I chose was $10 on sale at Hobby Lobby and I already had the scrapbook paper. Viola! Not too shabby!

A kind of neat side note I would like to share is the scavenger hunt I went on to find my new-in-package magnets that I wanted to put on the back so I could put it on the refrigerator. I looked long and hard for them without turning up anything. Finally, I sat down and said a little prayer asking God to help me find my magnets. {I know, seems so insignificant.}

Well, I said my prayer, I got back up and went downstairs to look one more time. After looking in a couple spots I decided I would look in a regular cardboard box that I had long forgotten what was even in it. Guess what I found! My magnets!!! See, no prayer is too small! I was ecstatic!

The down side: The magnets are not strong enough to keep the frame on the refrigerator. Oh, well. You can't have it all!


Thursday, September 6, 2012

Homemade Dish Soap


In an effort to save money and to rid our household of harsh chemicals I have been making my own cleaning products. My first experience was my own laundry detergent. I have since made my own soap scum remover. My latest endevor has been dish soap.

I looked for a long time trying to find a recipe that made the most sense and this recipe is the one I decided to try. It includes only four main components and was rather simple to make:


I used Arm & Hammer Washing Soda, found in the laundry detergent aisle, Kirk's Castile bar soap, Tea Tree Oil essential oil, and white vinegar. The recipe I followed actually used liquid Castile soap, but I used the bar soap and just grated it. I also doubled my recipe so I don't have to make it that often.


Make sure to let it cool completey and stir well to make sure the soap dissolves into the mixture. There won't be a lot of suds, but I noticed I really didn't have any. I could see the soap was mixed well in the water, but suds have always made me feel like the soap was "working".  I have read, however, that you may have a better chance of suds if you have soft water. We have hard water so that is probably my problem. 


Cost wise this was very inexpensive. The Castile soap was $3.39 for three bars. So one recipe would be $.56. The washing soda is $3.24 for 55 oz. and we are only using 2 TBS! So you can see how extremely minimal the cost is to make.

I thought it worked pretty good. My dishes seemed to come out clean. I will keep you updated as I use it more, if you try it yourself please feel free to comment and share your experience!

Hope you enjoy!


UPDATE: In an effort to mix it better, I ended up making really foamy. I thought that the foam would go down like usual, but it stayed. I have still been using it. It is a little harder to squeeze out since the foam is so thick. Not sure if that was suposed to happen or not!

Tuesday, June 5, 2012

Big Boy Bed

It is a big day for Wyatt today! He gets his Big Boy Bed! He is so excited! We got the bed at Habitat for Humanity for $28 a couple weeks ago. It is a steel bed and very solid. Just needed some TLC. I kind of liked the way it looked originally, but it had a lot of rust, so I ended up painting it.


{Before}


{Nick sanded down the rusty spots for me}


Today we went and got the mattress and box springs. We kind of looked a little hillbilly with them strapped to the roof of our car... but we were able to get them home.


{Finished!}


{Had to test it out!}


I didn't realize how tall it is after it was all put together. We are going to have to get a swimming noodle to put underneath the sheet to help him from rolling off the edge. It is a MUCH bigger fall with this bed! I am also hoping this will renew our desire for naps too! I know, I am probably not going to see that, but I can hope can't I?


Wednesday, May 30, 2012

High Low Kind of Day

Today has been quite the day. It has been a true test of the wits, our patience, our strength in consistency, and will power! When Wyatt first turned two, I thought, the terrible twos, they aren't so bad. Then he turned three, and wow look out! Now that he is four I think we have matched and raised the bar once again. These last couple days have shown a decline in listening skills to the point they almost no longer exist. It is beyond the typical selective hearing you normally get. Taking toys away, time outs, and spankings are short term consequences that no longer phase. The only thing we can do is keep on keeping on. Consistency is key. With the Lords help we can and will persevere!

With that, here is a glimpse of the behavior we had today. Mind you this was the worse, but this wasn't the only misbehavior...


{Red crayon on our bedroom wall}


{He told us it is a map.}


Oh, and yes, he did have to wash it off. Very thankful today for Magic Erasers.

However, on a much more positive note, my husband made my day! I have been wanting a head board for our bed ever since I had to rearrange things to make room for a dresser and cradle. We had to put our bed on an angle to accommodate. I will be nursing the baby and really wanted something I could lean back on for those late night feedings.  So, my wonderful husband, being resourceful as he is, built me a head board!


{Finished Head Board}


It is everything that I wanted! He did a fantastic job! He used scrap lumber we had lying around so it cost us nothing AND it turned out great! I am one happy wifey!

So, overall we survived our day despite the trials we faced as parents. Exhausted? Yes. There will be days like this, but thankfully they are far and in between!


Monday, April 23, 2012

Upcycled Cabinet

Well, last fall my dad gave me this cabinet that he had in his garage for nearly 30 years. Not sure what I would do with it, but didn't want to see it get thrown out, I rescued it and gave it shelter in our basement. We just used it for storage.

Then I got a bug up my behind and decided to do something different with it. {I go through spurts where I feel claustrophobic in our little house on the hill and need to do something about it.} I had a bookcase I found at a garage sale a few years ago and decided that I would refinish the cabinet and then attach the bookcase to the top and have...{drum roll}... more storage!

Living in a garage for almost 30 years tends to take a toll on things, especially when they are used to store things like oil and miscellaneous car parts. So, needless to say, it was a little rough.


With a little elbow grease I was able to wash and sand the stains down enough they covered well. I put on a coat of Killz to keep the stains from bleeding through. The inside of the cabinet I painted a cheery yellow. {For some reason I am loving yellow lately.}


I had to take a couple weeks off working on it due to the weather, it got cold again. But I was able to finish and gave it a new home in our living room by our fireplace. I was able to get rid of a generic DVD cabinet and boat book shelf and still had enough extra to store some of Wyatt's puzzles, paints, and play-doh!


I don't know if you can tell by the picture, but yes, the book case is upside down. I did that on purpose. If I would have put the book case the right way, there wouldn't be enough space between the bottom shelf and the cabinet.

I am happy with how it turned out. Looks WAY better than before!


Monday, April 16, 2012

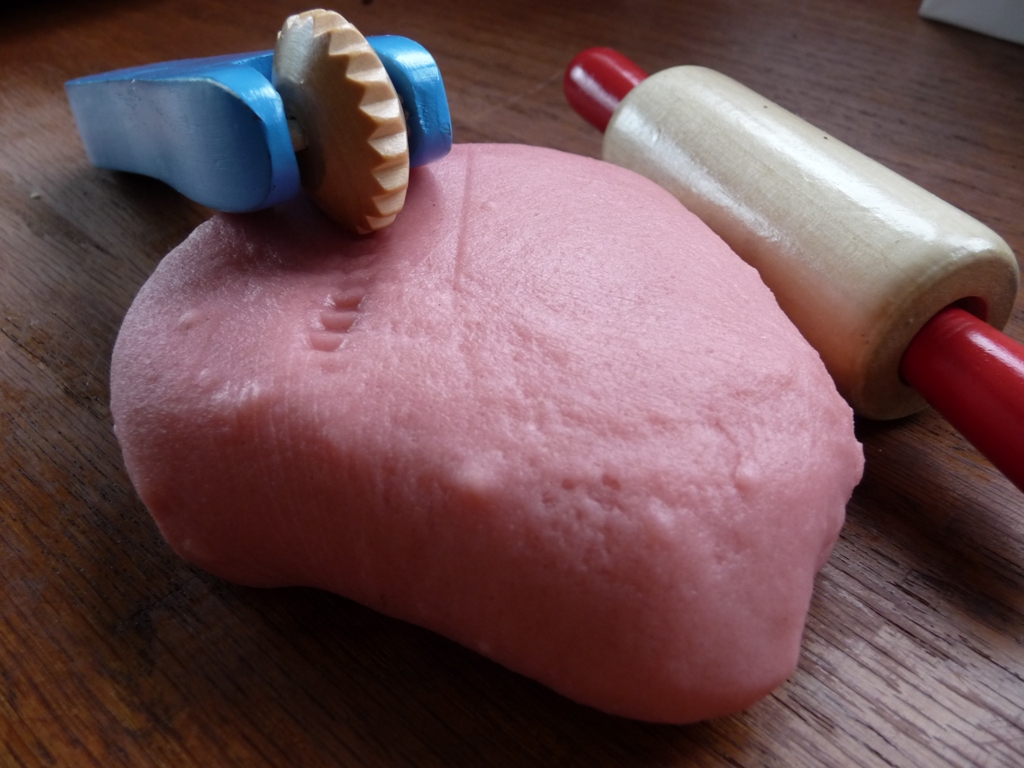
Kool-Aid Play-Doh


For my sons 4th Birthday I put together favors that included a Kool-Aid Play-Doh recipe with all the dry fixings. It is very easy to make!


1 C. Boiling Water
1 T. Cooking Oil
1/4 C. Salt
3/4 C. Flour
1 Packet of Kool-Aid
1 t. Cream of Tarter


Stir in water, oil, and salt until dissolved.
Stir in flour, Kool-Aid, and cream of tarter
Add flour as needed if too sticky
Store in air tight container or ziploc bag


Hope you enjoy!


Saturday, March 3, 2012

Rag Quilt: Made With Love!

Well, I finished my Rag Quilt for the baby! Whew! Good experience for sure! I love the way it turned out, although it is far from perfect. I have to say, I did wake up this morning a little stiff from working on this all afternoon yesterday. Who would have thought sewing could be so intense!

The top went together very easily. I cut the strips of material to 4 inch widths and then sewed them together.


{Strips laid out}


{First sewn strip!}

I did it in three sections then sewed the sections together. I went really fast. It went so good I got a little over confident and proceeded to cut out the minky backing. As I was cutting I told myself I should measure it again just to be sure, but quickly dismissed myself. Boy, I sure wish I would have listened! I cut the wrong way on the material and cut myself short!

But it worked out okay. I just had to take away two strips, one on each end and it made the material match in size with out having to get into a lot of math trying to make it work otherwise. It is still a good size despite my error.


{Wyatt had to test it out!}


The hard part was the minky material. Wow! That does NOT like to stay in place! I pinned and pinned and it still moved on me. I did have to "touch up" some spots that came undone, but since it's a Rag Quilt, it doesn't take away from the look.


{Voila!}


{Finished with pillow}


I still had enough extra material to make a little pillow that matches. With the pillow I tried a different technique when using the minky material. Instead of putting the seam on the inside I just sewed the two pieces together on the outside. It worked MUCH better! I think my first Rag Quilt turned out pretty good for my first one and I will definitely being doing another soon!